
How to Clean a Furnace Flame Sensor (Step-by-Step)
- Bryn Fortmuller
- Aug 1
- 11 min read
If your furnace lights up, runs for a few seconds, then shuts off and tries again, a dirty flame sensor is almost always the reason. The good news: you can fix it yourself in about 15 minutes with a screwdriver and a piece of steel wool. Here's exactly how to do it safely.
Table of Contents
What Is a Furnace Flame Sensor and Why Does It Get Dirty?
The flame sensor is a thin metal rod, usually 2 to 4 inches long, mounted inside the burner assembly. Its only job is to confirm that the burner actually ignited after the gas valve opens. It does this through a process called flame rectification : the control board sends a small AC voltage to the rod, and the ionized gases in the flame let a tiny direct current flow back through the rod to the board. We're talking microamps here, millionths of an amp.
If the board doesn't read that signal within a few seconds of ignition, it closes the gas valve and tries again. After three failed attempts, most furnaces lock out completely, sometimes for an hour or two, before retrying. That's the cycling you hear on a cold night.
Because the signal is so small, even a thin film of oxidation, soot, or silica on the rod is enough to block it. The flame is real. The furnace just can't prove it. That film builds up naturally over a heating season, which is why annual cleaning is worth building into your winter furnace maintenance checklist .
Carbon monoxide is a serious household safety risk. The flame sensor is one of the key safety components that prevents unburned gas from accumulating in your home, so keeping it clean matters beyond just comfort.
Signs Your Flame Sensor Needs Cleaning
The most obvious sign is a furnace that short cycles: it lights, runs for 3 to 10 seconds, shuts off, waits a couple of minutes, then tries again. You might hear this happen two or three times in a row before the system goes quiet entirely.
Other signs worth noting:
The furnace starts but blows cold air because the gas valve shuts off before the heat exchanger warms up
Your furnace display shows an error code related to flame detection or ignition failure
The heating cycle takes noticeably longer than usual to get the house up to temperature
The burner lights but the flame looks weak or uneven
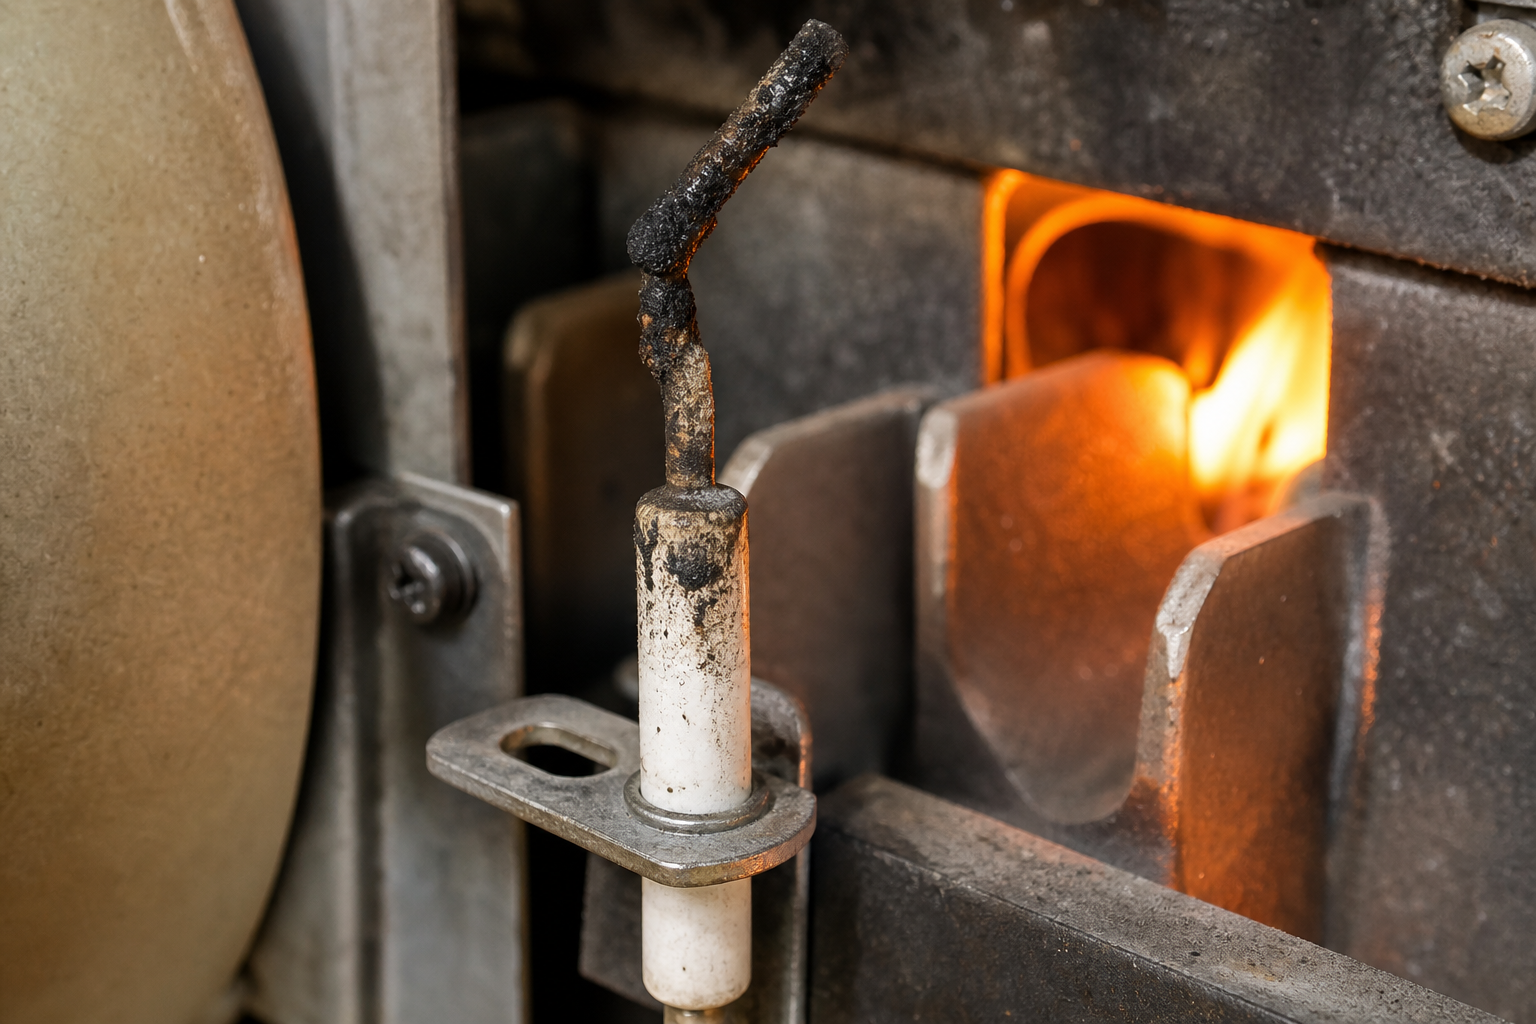
If you pull the sensor out and look at it, a dirty one will have a dull gray or black coating on the rod. A clean sensor looks almost shiny. That visual difference tells you everything.
One thing to check first: make sure the burner is actually igniting. If you can see the flame light and then go out, that points to the sensor. If the igniter glows but no flame appears at all, you may have a gas supply or igniter problem instead, which is a different repair.
Key Takeaway:A furnace that lights and shuts off within 10 seconds, repeatedly, almost always has a dirty flame sensor. That's your cue to clean it before calling anyone.
Tools and Materials You'll Need
You don't need anything special for this job. Most of it is probably already in your garage.
Screwdriver or nut driver(usually a 1/4-inch hex driver or a standard Phillips)
Fine steel wool(grade #0000 or similar; a Brillo pad works too)
400 to 600 grit emery clothas an alternative to steel wool
Clean microfiber clothto wipe the rod after cleaning
Work glovesto keep skin oils off the sensor rod
Flashlight or headlampto see inside the burner compartment
Magnetic parts tray(optional but worth it so you don't lose the mounting screw)
One thing you shouldnotuse: regular sandpaper. It's too aggressive and can scratch the rod's surface, which shortens the sensor's life. Steel wool or a fine emery cloth gives you just enough abrasion to remove the buildup without damaging the metal underneath.
A $5 bill also works in a pinch. It's made of linen and cotton fiber, which is just abrasive enough to polish off light buildup without scratching. It sounds odd, but it's a real trick used by technicians in the field.
Step 1: Turn Off Power and Thermostat Safely
Before you touch anything inside the furnace, cut the power. This is non-negotiable.
Start at the thermostat. Set it to off so the system isn't calling for heat while you work. Then find the furnace's dedicated power switch, which looks like a standard light switch and is usually mounted on the wall near the unit or on the furnace itself. Flip it off.
For an extra layer of safety, go to your electrical panel and flip the furnace breaker as well. This ensures no accidental startup while your hands are inside the cabinet. If your furnace has a gas shutoff valve on the supply line, turn that too. You want zero chance of gas flowing while the burner assembly is exposed.
If the furnace has been running recently, give it at least 15 to 30 minutes to cool down before you open the access panel. The burner area and heat exchanger hold heat longer than you'd expect. Burns from a hasty repair are more common than electrical injuries in DIY furnace work.
Pro Tip:Take a photo of the inside of the burner compartment before you remove anything. It takes two seconds and gives you a reference point for where the sensor sits and how the wire routes, so reinstallation is straightforward.
By the end of this step, the thermostat is off, the furnace switch is off, the breaker is off, and the unit has cooled. You're ready to open it up.
Step 2: Remove and Inspect the Flame Sensor
Remove the front access panel from the furnace. Depending on your model, it either lifts off, slides up, or is held by one or two screws. Set it aside somewhere it won't get kicked.
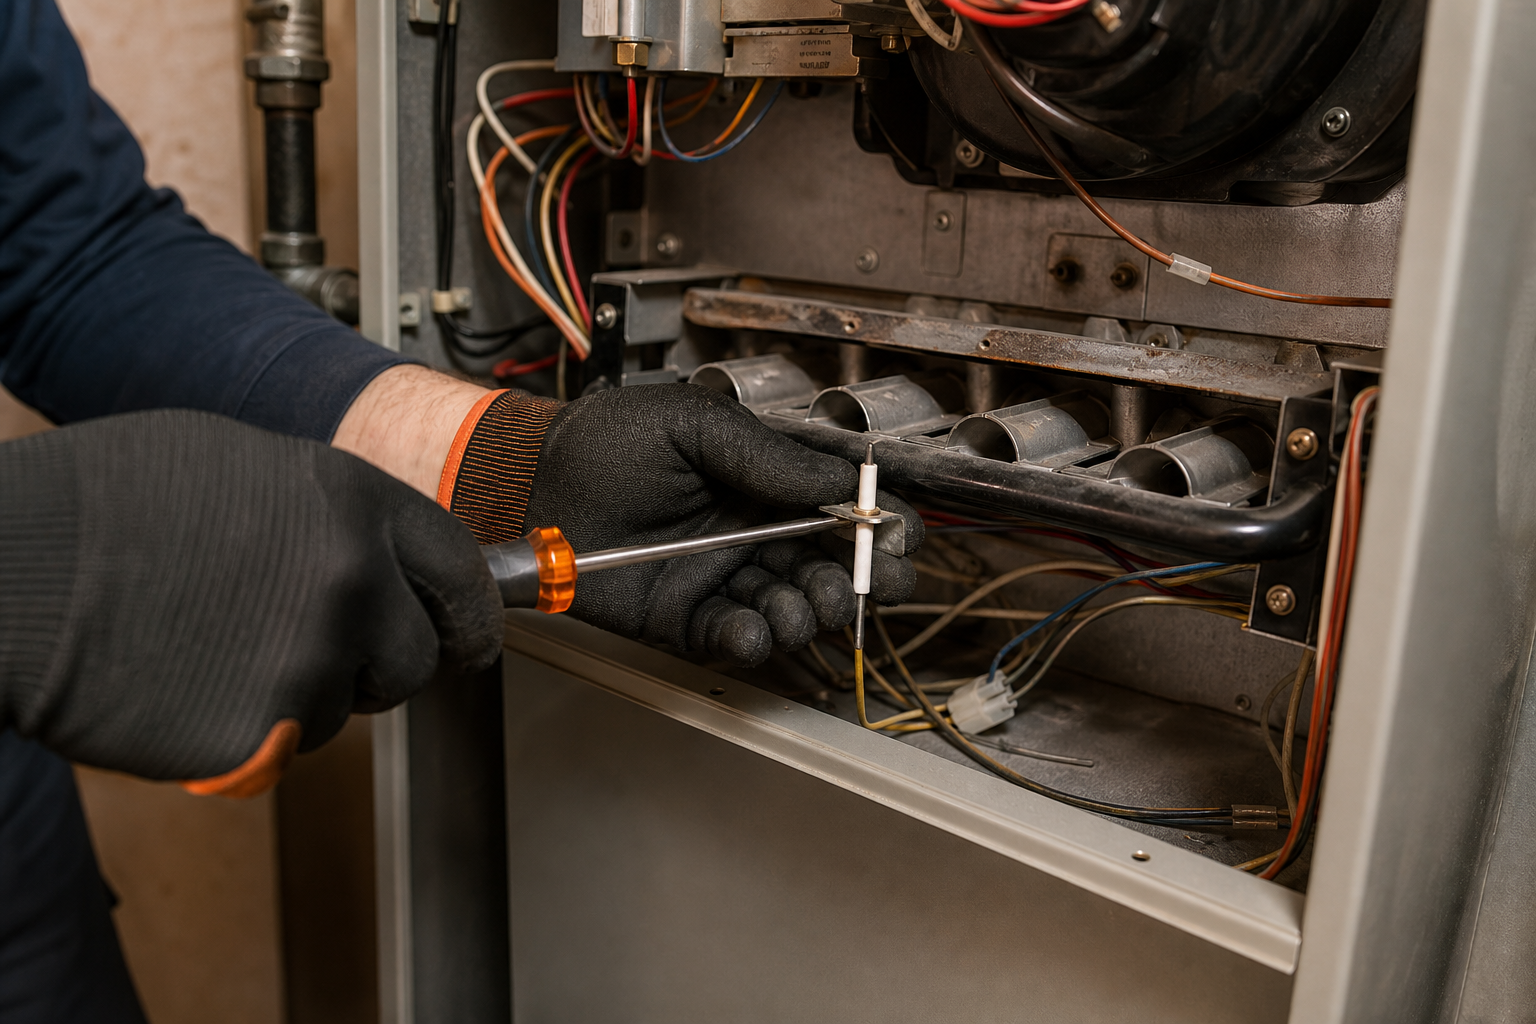
Now look inside the burner compartment. You're looking for a thin metal rod with a white ceramic (porcelain) base and a single wire connected to it. That single wire is the key identifier. The igniter nearby usually has two wires, so if you see two, move on. The flame sensor is the one-wire rod.
Some sensors point straight out. Others bend at a 45 or 90-degree angle. The shape varies by furnace brand and model, but the mounting is almost always the same: one screw through a small bracket.
Disconnect the wire from the sensor first. It usually pulls straight off. Then use your screwdriver or nut driver to remove the mounting screw. Keep that screw somewhere safe, like a magnetic parts tray, because it's small and easy to lose on a concrete floor.
Slide the sensor out carefully. Don't scrape it against the cabinet edges. Once it's out, hold it by the porcelain base only. Skin oils on the metal rod can interfere with the sensor's ability to read the flame signal, so gloves are worth wearing throughout this step.
Look at the rod under your flashlight. If it's dull, gray, black, or has any visible coating, it needs cleaning. on furnace flame sensors, a sensor tip that's black or misshapen is a sign that replacement may be needed rather than cleaning alone. Keep that in mind as you inspect it.
By now you should have the sensor in your hand, disconnected from the wire, with the mounting screw safely set aside.
Step 3: Clean the Sensor Rod
This is the core of the whole job, and it's simpler than it sounds.
Hold the sensor by its porcelain base. Improve your steel wool or emery cloth and wrap it lightly around the metal rod. Apply gentle, even pressure and rub along the length of the rod. Rotate it as you go so you clean all sides. You're not trying to scrub it hard. Think of it more like polishing than sanding.
You'll feel the difference as you work. A dirty rod has a slightly gritty texture. As the buildup comes off, the surface gets smoother. You don't need to get it mirror-shiny, just clean enough that the coating is gone and the metal is exposed again.
Spend about a minute on this. That's genuinely all it takes for most sensors. The fastest recorded step in this process from field data is about 5 minutes total for the scrub and wipe, so don't overthink it.
Once the rod looks clean, wipe it down with your microfiber cloth to remove any steel wool fibers or loose debris. You don't want those getting into the burner assembly when you reinstall.
A few things to avoid during this step:
Don't use regular sandpaper. It scratches too deep and removes the protective surface layer.
Don't touch the metal rod with bare fingers after cleaning. Put your gloves back on if you took them off.
Don't bend the rod. It's more fragile than it looks, and a bent sensor won't sit in the flame correctly.
Don't use rubbing alcohol as your primary cleaning method. Light abrasion works better at removing the oxidized film that causes the problem.
Also check the porcelain base while you have the sensor out. A hairline crack in the ceramic insulator lets the electrical signal leak to ground, and no amount of cleaning will fix that. If you see a crack, the sensor needs to be replaced, not cleaned.
For homeowners in the Placer County and Nevada County area, this annual cleaning is especially worth doing before the cold season hits. Sierra foothill winters can arrive fast, and a furnace that locks out on a 25-degree night is not a fun problem to troubleshoot at 11 PM. The team at Home Worx Heating and Cooling includes this check as part of every seasonal maintenance visit for exactly that reason.
Step 4: Reinstall, Restore Power, and Test the Furnace
Slide the clean sensor back into its bracket in the same position it came from. The photo you took earlier is useful here. The sensor needs to sit inside the burner flame path, so alignment matters. Most brackets only allow one correct position, but double-check that the rod is angled toward the flame, not away from it.
Thread the mounting screw back in by hand first, then tighten it with your screwdriver. Snug is the goal. Don't overtighten it. The bracket is usually aluminum and the threads strip easily if you force it.
Reconnect the wire to the sensor terminal. Push it on until it seats fully. A loose connection here will give you the same symptom as a dirty sensor, so make sure it's secure.
Check that you haven't left any tools inside the cabinet. Replace the access panel and make sure it's properly seated. Some furnaces have a door safety switch that won't let the unit start if the panel isn't fully closed.
Now restore power in reverse order: flip the breaker back on, then the furnace switch, then turn the gas valve back to open. Go to your thermostat and set it to heat, then raise the temperature above the current room temperature to call for a heating cycle.
Watch the startup sequence. The igniter will glow, the gas will light, and the burner flame should stay on this time. If the furnace runs through a full cycle without shutting off prematurely, the cleaning worked. That sustained flame is your confirmation.
If it still short cycles after cleaning, the sensor may need replacement, or there's another issue in the system worth having a technician diagnose. Cleaning the flame sensor is the right first step, but it's not a fix for every ignition problem.
When to Replace the Sensor Instead of Cleaning It
Cleaning works most of the time, but not always. Here's when to skip the steel wool and just buy a new sensor.
The most reliable test is a multimeter set to microamps (µA DC). Disconnect the sensor wire, connect the meter in series between the wire and the sensor terminal, then start a heat cycle. A reading of 2 to 6 µA is healthy. Anything below 1 µA means the sensor can't produce a strong enough signal, even if it looks clean. That sensor is done.
You should also replace the sensor if:
The rod is visibly cracked, corroded, or bent out of shape
The porcelain base has a hairline crack (the signal leaks to ground and cleaning won't help)
You've cleaned it two or three times this season and the short cycling keeps coming back
The wire or connector is frayed or corroded at the terminal
Replacement sensors are inexpensive. Most universal flame sensors cost between $10 and $30, and brand-specific sensors for common furnace models are in the same range. It's worth keeping a spare on hand, especially if you're in a rural area where a Sunday hardware run isn't easy. Make sure the replacement is compatible with your furnace model; check your owner's manual or the model number on the existing sensor.
If you're not comfortable with the multimeter test or the furnace still isn't behaving after a sensor swap, that's a good time to call in a professional. Home Worx Heating and Cooling serves homeowners across Placer and Nevada Counties and can diagnose ignition issues quickly, whether it's the sensor, the control board, the gas valve, or something else entirely. You can also browse our HVAC maintenance checklist for homeowners to see what else is worth checking on your system before the season changes.
Flame sensors typically last around five years with regular cleaning. The average furnace lifespan is 15 to 30 years, so most homeowners will replace the sensor at least once or twice over the life of the system.
Frequently Asked Questions
How often should I clean my furnace flame sensor?
Once a year is the standard recommendation, ideally before the heating season starts in early fall. If your home has pets, heavy dust, or poor air filtration, you may need to clean it more often. Homes in dusty environments, like properties near construction or with older duct systems, sometimes need cleaning every six months. Changing your air filter every one to three months also reduces how fast the sensor gets coated.
Can I clean a flame sensor without turning off the power?
No. Always cut power to the furnace before removing the sensor. The furnace can attempt to start a heating cycle at any moment while the thermostat is calling for heat, and working inside an active burner assembly is dangerous. Turn off the thermostat, the furnace switch, and the breaker before opening the access panel. This takes about 30 seconds and prevents a serious injury.
What happens if I touch the flame sensor rod with my bare hands?
Skin oils transfer to the metal rod and can interfere with the sensor's ability to conduct the microamp signal through the flame. It's not guaranteed to cause a problem immediately, but it can accelerate buildup and reduce how long the cleaning lasts. Wear gloves when handling the sensor, and if you do touch the rod accidentally, wipe it clean with a dry microfiber cloth before reinstalling.
Why does my furnace still short cycle after I cleaned the sensor?
A few possibilities: the sensor is too worn to clean back to working condition, the porcelain base has a hairline crack, the wire connection is loose, or the problem isn't the sensor at all. Other causes of short cycling include a dirty air filter restricting airflow, an overheating heat exchanger, or a faulty control board. If cleaning didn't fix it, a multimeter test will tell you whether the sensor itself is the issue or whether something else needs attention.
How much does a new flame sensor cost?
Most replacement flame sensors cost between $10 and $30 for the part. Labor costs for professional replacement vary by service provider and location. For homeowners in Placer and Nevada County, Home Worx Heating and Cooling can give you an honest assessment of whether cleaning or replacement makes more sense before any work begins.
Is a flame sensor the same as a thermocouple?
No. A thermocouple is found on older furnaces with a standing pilot light and works by generating a small millivolt voltage from heat. A flame sensor is used in modern furnaces with electronic ignition and works through flame rectification, measuring a microamp DC current through the flame. They look similar but are not interchangeable. If your furnace has a pilot light that burns continuously, you have a thermocouple, not a flame sensor.
Wrapping Up
A dirty flame sensor is one of the most common reasons a furnace short cycles, and cleaning it is a straightforward job most homeowners can handle in under 20 minutes. Turn off the power, remove the sensor, polish the rod with fine steel wool, reinstall it, and test. If the furnace runs a full cycle without cutting out, you're done. If the problem comes back or the sensor fails the multimeter test, replacement is the next step. For anything beyond that, the Home Worx Heating and Cooling team is here to help homeowners across Colfax, Auburn, Grass Valley, and the wider Placer and Nevada County region. Contact Home Worx Heating and Cooling to schedule a furnace inspection or tune-up before winter gets going.