
How to Clean an Evaporator Coil Safely
A dirty evaporator coil can cut airflow, make your AC run longer, and leave ice on the refrigerant lines. The spray can is only one part of the job. Here’s how to clean an evaporator coil with less risk, plus when Home Worx Heating and Cooling should handle it.
Table of Contents
Step 1: Turn Off Power and Prepare the Work Area
The goal is to make the air handler safe before water or cleaner gets near it. Start by setting the thermostat to Off. Then switch off the breaker for the furnace or air handler.
Do not rely on the thermostat alone. Find the equipment switch near the indoor unit and turn it off too. If you have the training and the right meter, verify that power is absent. A live air handler can contain high-voltage parts, even when the blower is still.
Give the coil time to thaw if you see ice. Do not chip the ice away. That can bend fins or damage the tubing. If ice returns after thawing, stop the cleaning job. A dirty filter, poor airflow, or low refrigerant may be the cause.
Protect the floor before opening the cabinet. Put down an absorbent pad or a plastic sheet. Have a shallow pan ready under the coil. Wear safety glasses and gloves. The fins are sharp, and coil cleaners can irritate skin and eyes.
Gather your tools before you start:
Screwdriver
Flashlight
Soft-bristle brush
Shop vacuum with a brush attachment
No-rinse coil cleaner
Fin comb that matches the fin spacing
Spray bottle
A soft brush and shop vacuum are enough for light dust. For a complete safety check, including the disconnect and equipment wiring, follow the electrical servicing principles described by the electrical safety guidance for AC coil work. If the panel is hard to reach in an attic or tight closet, it’s safer to stop and ask Home Worx Heating and Cooling for help.
Homeowners in Auburn and Colfax often deal with dry summer dust that reaches the return grille. Change the filter before the coil becomes packed. That simple habit reduces the amount of dirt that reaches the indoor coil. Similar conditions can affect homes in Rocklin and Roseville, while Grass Valley, Penn Valley, and Lincoln homeowners should also keep the return area and filter clear.
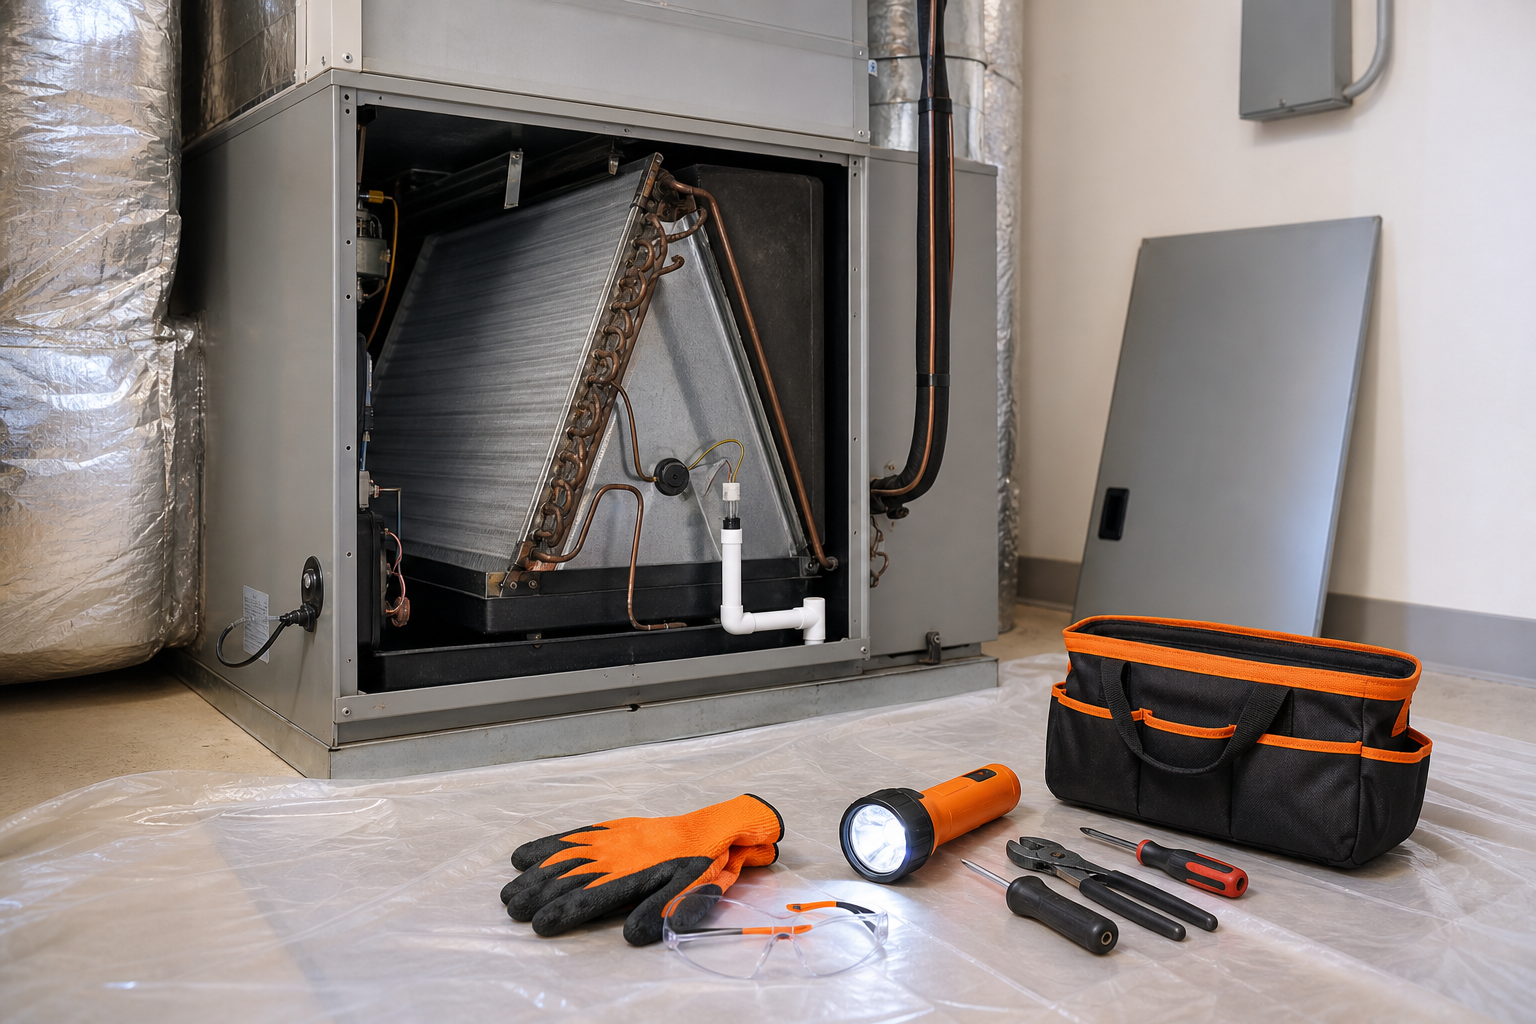
For local evaporator coil cleaning help in Auburn, Colfax, Rocklin, Roseville, Grass Valley, Penn Valley, or Lincoln, contact Home Worx Heating and Cooling.
Step 2: Remove the Access Panel and Inspect the Coil
When learning how to clean an evaporator coil, inspection comes before spray. You need to confirm that dirt is the problem and check for damage that cleaning won’t fix.
Use the flashlight to find the panel on the air handler or furnace cabinet. Remove each screw slowly and place the fasteners in a cup. Some panels slide out. Others lift away after the screws come out. Never force a panel against copper refrigerant lines or wiring.
Look at the coil face without touching it. A light coating of dust may need only dry cleaning. A gray, matted surface points to deeper buildup. Dark growth on the coil or drain pan needs more care, especially if the smell returns when the system runs.
Check the drain pan too. A little dampness is normal. Standing water is not. A blocked drain can make cleaner back up into the cabinet or spill onto the floor.
What you see | What it may mean | Safer next move |
Light dust with open fin gaps | Surface buildup | Use a soft brush or shop vacuum |
Gray mat covering much of the coil | Restricted airflow | Use an evaporator-safe cleaner or book service |
Ice on the coil or refrigerant line | Airflow or refrigerant problem | Let it thaw, then call an HVAC technician |
Standing water in the pan | Drain blockage or poor drainage | Clear the drain before wet cleaning |
Rust, cracked pan, or oily residue | Equipment damage or possible leak | Stop and request professional inspection |
Keep the breaker off while you inspect. Do not touch capacitors, control boards, or refrigerant fittings. Those parts are outside a safe homeowner cleaning task.
In Rocklin and Roseville, many indoor units sit in garages, closets, or attic spaces. Access can change the job. A coil that looks easy to reach may sit behind a second liner or near exposed electrical parts. If you cannot see the whole coil, do not spray blindly.
Key Takeaway:If the coil is frozen, badly moldy, leaking, or hard to reach, cleaning is not the first repair. Find the cause before applying a chemical.
Step 3: Remove Loose Dust Without Bending the Fins
This dry pass keeps loose dirt from turning into wet sludge. It also lets you see how much buildup remains before you choose a cleaner.
Start with the shop vacuum. Fit the brush attachment and keep it just above the fin surface. Move slowly in the same direction as the fins. Do not press the nozzle into the coil. Suction can flatten the aluminum if you hold it in one spot.
A soft-bristle brush works well on dust that the vacuum misses. Brush along the fin channels, never sideways across them. The thin fins transfer heat, and bent sections restrict airflow for good.
For very light dust, compressed air can work. Wear eye protection and direct the air so debris moves out of the cabinet. Avoid forcing dust deeper into the coil or toward the blower motor.
Use a fin comb only on small bent areas. Match the comb to the fin spacing. Pull it gently through the damaged section. Do not try to make every fin perfect with force. A broken fin is harder to fix than a slightly bent one.
A soft brush or compressed air can help remove loose debris, but avoid high pressure near delicate fins.
After vacuuming, inspect the bottom edge of the coil. Clear loose debris from the drain pan and drain openings. Do not poke a wire deep into the coil. You could damage the tubing or push dirt into the drain path.
Homeowners in Grass Valley and Penn Valley may see extra dust after dry, windy weather. Auburn, Colfax, Rocklin, Roseville, and Lincoln homeowners may notice the same. Check the filter and return grille before blaming the coil. If the filter is clogged again soon after replacement, the system may have a return-air leak or another airflow issue. For persistent problems, contact Home Worx Heating and Cooling for local service.
Step 4: Apply the Right Coil Cleaner and Rinse Carefully
The cleaner should match the indoor coil. For most accessible evaporator coils, use a no-rinse coil cleaner labeled for indoor HVAC coils. It should break down dirt while the condensate drains away.
Do not use bleach, ammonia, abrasive powder, or an acidic product. Household chemicals may corrode aluminum or leave residue behind. Do not use a pressure washer. High pressure can fold the fins and drive dirt deeper into the coil.
Read the cleaner’s label before spraying. Protect the blower, control board, wiring, and cabinet seams with plastic. Keep protective material or a catch pan in place. Spray in short passes from the clean side toward the dirty side when the coil design allows it. Avoid soaking electrical parts.
Let the foam sit for the time listed on the product. Do not scrub right away. The chemical needs time to loosen grime. If the label permits a second light application, use one rather than increasing spray pressure.
For light contamination, a no-rinse product may drain into the condensate pan. For other cleaning approaches and detailed coil-care techniques, see How to Clean Air Conditioner Coils: 10 Methods . If the product requires rinsing, use only a gentle flow and control the runoff. Indoor evaporator coils are different from outdoor condenser coils. Water inside an air handler can damage parts or leak into the home.
Keep an eye on the drain pan as the foam works. If water rises instead of draining, stop. A clogged condensate line needs separate attention. Do not keep adding water to a blocked pan.
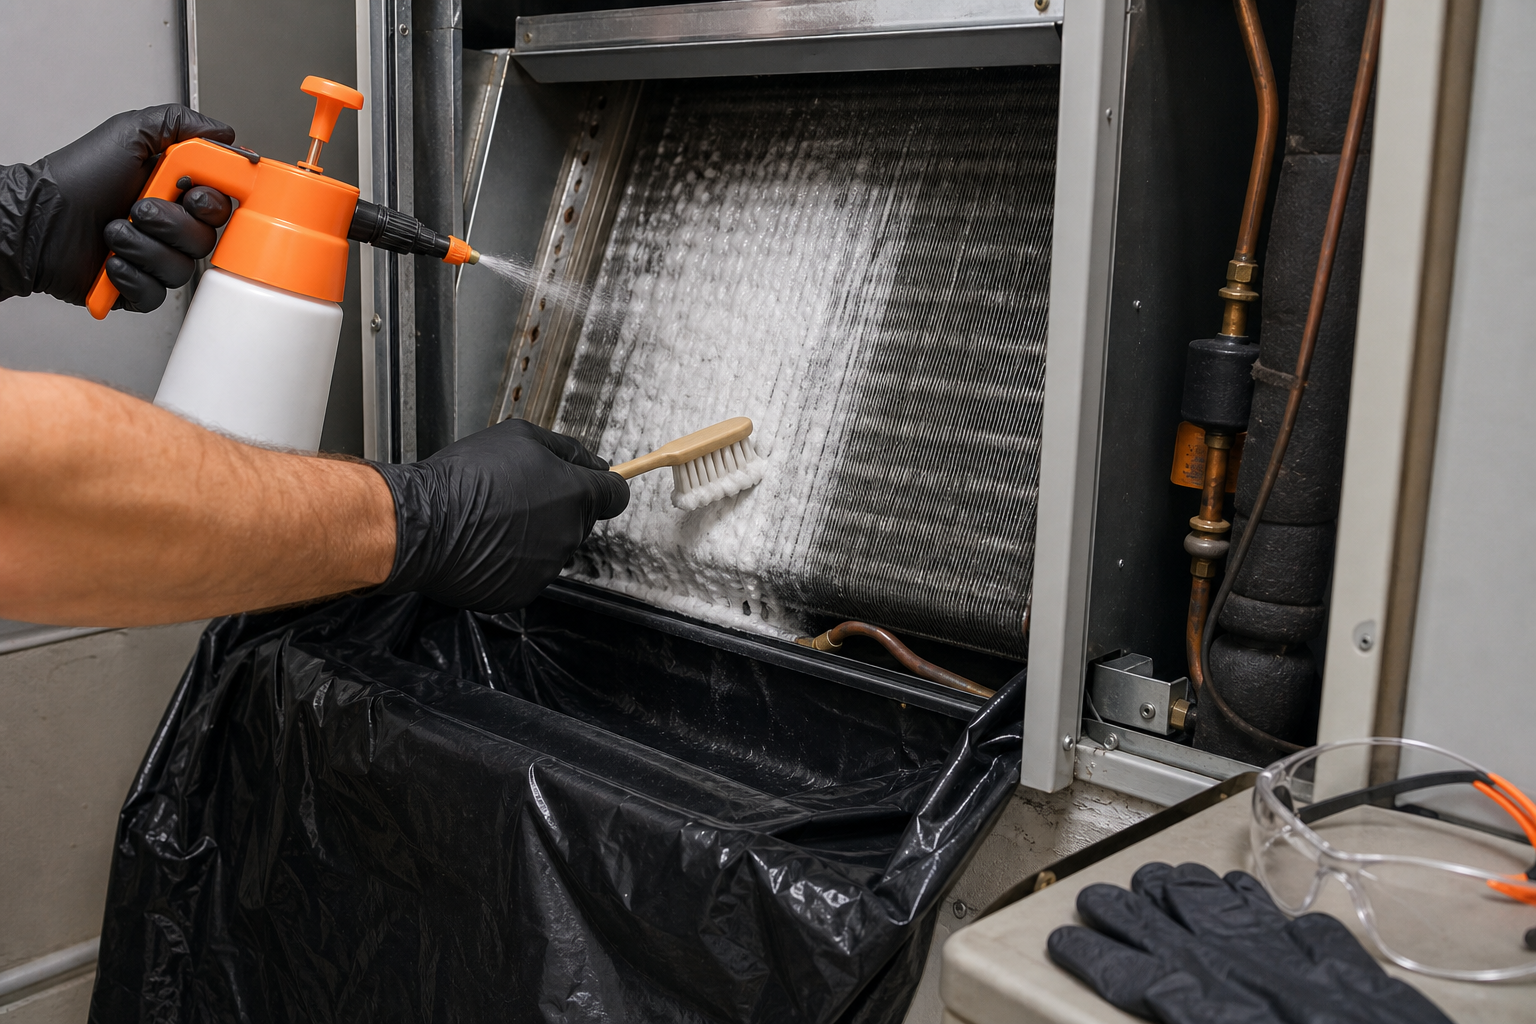
The research behind this cleaning method shows a clear tradeoff. DIY tools cost less, but a professional cleaning includes the full work area setup, protective gear, runoff control, and equipment checks. Home Worx Heating and Cooling lists evaporator coil cleaning at $180 to $320, depending on the service details and access.
That cost can make sense when the coil sits in a cramped attic, when contamination is heavy, or when the drain pan needs inspection at the same time. Our team serves Auburn, Colfax, Rocklin, Roseville, Grass Valley, Penn Valley, and Lincoln across Placer and Nevada County communities, so you don’t have to turn a tight-access job into a risky weekend project.
Pro Tip:Never restore power while the cabinet, wiring, or control board still has visible moisture. Wait longer if the air handler is in a cool attic or the wet cleaning was heavy.
Step 5: Reassemble, Restore Power, and Check Operation
Reassembly is part of how to clean an evaporator coil safely. A clean coil does not help if the access panel leaks air or the drain pan is still blocked.
First, check the pan. Remove loose sludge with a towel or wet vacuum. Confirm that water can leave through the drain. Look for cracks, rust, or water near the cabinet base.
Replace any inner liner in its original position. Set the access panel flush against the cabinet. Start each screw by hand, then tighten it until snug. Do not strip the thin sheet metal.
Leave the system off while it dries. Home Worx Heating and Cooling’s listed service procedure includes a 30 to 60 minute drying period. A longer wait is sensible when you used a wet rinse or see moisture near the cabinet seams.
Restore power at the breaker. Then turn on the equipment switch and set the thermostat to cooling. Stay near the air handler for the first few minutes. Listen for scraping, buzzing, or water movement.
Check the supply vents after the system runs. Airflow should feel steady. Look at the drain area for leaks. If the AC blows warm air, freezes again, trips the breaker, or makes a new noise, turn it off and get service.
A professional test can catch issues that a visual check cannot, and yearly maintenance covers more than spraying the coil.
For related symptoms, our guide to common causes of a freezing AC can help you decide whether the coil is really the source of the problem.
For many homes in Auburn and Colfax, inspect the coil once each cooling season. In Rocklin and Roseville, replace filters based on household dust and pet activity. Annual professional maintenance is a sound choice for units running hard through hot Sierra foothill summers in Grass Valley, Penn Valley, and Lincoln.
Contact Home Worx Heating and Cooling for local service.
FAQ: Cleaning an Evaporator Coil
Can I clean my evaporator coil myself?
Yes, you can clean a lightly dirty evaporator coil if you can safely shut off power and reach the coil. Use a soft brush, gentle vacuum, and cleaner made for indoor HVAC coils. Stop if you find ice, heavy mold, a leak, damaged wiring, or a blocked drain. Those signs need a qualified HVAC professional.
What is the best cleaner for an evaporator coil?
The best choice is a no-rinse coil cleaner when rinsing is inconvenient. Never use bleach, ammonia, abrasive cleaners, or an acidic product on the fins. If the label calls for rinsing, control the water and protect the electrical parts first.
How often should an evaporator coil be cleaned?
Most homes should have the evaporator coil checked at least once a year, often before the cooling season. Homes in Auburn, Colfax, and Rocklin with pets, heavy dust, or long AC runtimes may need more frequent checks. Change the filter on schedule too. A dirty filter can send fresh dust straight back onto the coil.
What should I do if my AC coil is frozen?
Turn the cooling system off and let the ice thaw fully. Do not chip it away or spray cleaner onto the ice. Replace a dirty filter after the coil thaws, then watch the system. If it freezes again, stop using it and contact Home Worx Heating and Cooling because low refrigerant or another airflow fault may be involved.
How much does professional evaporator coil cleaning cost?
Professional evaporator coil cleaning often costs $100 to $400, based on access and contamination. Home Worx Heating and Cooling lists its service at $180 to $320. A professional visit may be the better value when the coil is inside a tight attic, the drain is blocked, or you need the system tested after cleaning. This can be especially useful for homeowners in Roseville, Grass Valley, Penn Valley, and Lincoln. Contact Home Worx Heating and Cooling for local service.
Conclusion
For light dust, a careful dry clean and an indoor-safe foaming product may be enough. If the coil is frozen, hard to reach, or heavily contaminated, skip the risk and contact Home Worx Heating and Cooling for local service in Auburn, Colfax, Rocklin, Roseville, Grass Valley, Penn Valley, or Lincoln.